Baking chicken in foil trays is a brilliant kitchen hack that ensures juicy, flavorful chicken with minimal effort. Whether you’re preparing a quick weeknight dinner or meal-prepping for the week, this method guarantees tender, perfectly seasoned chicken while keeping cleanup effortless.
By sealing the chicken in foil, you lock in moisture, enhance flavors, and allow the seasonings to infuse deeply, creating a deliciously aromatic dish. Plus, foil trays provide even heat distribution, ensuring your chicken is cooked to perfection every time.
If you’re looking for an easy, foolproof way to bake chicken while keeping your kitchen spotless, this recipe is for you. Let’s dive into this genius cooking trick that will elevate your chicken game!
Table of Contents
Why You’ll Love This Recipe
This baking chicken in foil trays method is the ultimate kitchen hack for achieving juicy, flavorful chicken with minimal effort and no mess. Whether you’re cooking for a quick weeknight dinner or preparing meals in advance, this technique ensures tender, perfectly baked chicken every time.
Locks in Moisture
The foil traps steam, keeping the chicken incredibly juicy and tender while enhancing its natural flavors.
Effortless Cleanup
Say goodbye to scrubbing pans—simply discard the foil tray for an easy, mess-free cooking experience.
Perfect for Meal Prep
This method allows you to batch-cook chicken for the week, making meal planning simpler and more convenient.
Customizable and Versatile
Easily adapt the seasonings, marinades, and vegetables to create new flavor combinations every time.
Even Cooking, Every Time
The foil helps distribute heat evenly, ensuring no dry spots or undercooked areas.
Once you try this foolproof, flavorful, and incredibly easy method, baking chicken in foil trays will become a staple in your kitchen!
Ingredients
To make this flavor-packed baked chicken in foil trays, you’ll need fresh ingredients and bold seasonings that enhance the taste and texture of the dish.
For the Foil-Wrapped Chicken:
- 3 pieces of aluminum foil (large enough to wrap each chicken breast)
- 2 red onions, sliced into half-moons
- 3 tomatoes, sliced into rounds
- 30 ml olive oil (for moisture and richness)
- 20 ml soy sauce (adds depth and umami flavor)
- 30 g brown sugar (for a subtle caramelized sweetness)
- 1 teaspoon oregano (for a fragrant, earthy touch)
- 1 teaspoon dried rosemary (adds warmth and aroma)
- 1 teaspoon salt (enhances all the flavors)
- Pinch of black pepper (for a mild kick)
- 3 crushed garlic cloves (boosts flavor with a rich, savory taste)
- 3 chicken breasts (boneless and skinless)
- 150 g grated mozzarella cheese (melts into a creamy, cheesy topping)
These simple yet powerful ingredients create a perfect balance of savory, sweet, and aromatic flavors, making this foil-baked chicken juicy, cheesy, and irresistibly delicious!
How to Make
This foil-baked chicken comes together with simple steps that lock in flavor and moisture while keeping cleanup effortless. Follow these easy instructions to create a delicious, cheesy, and juicy meal.
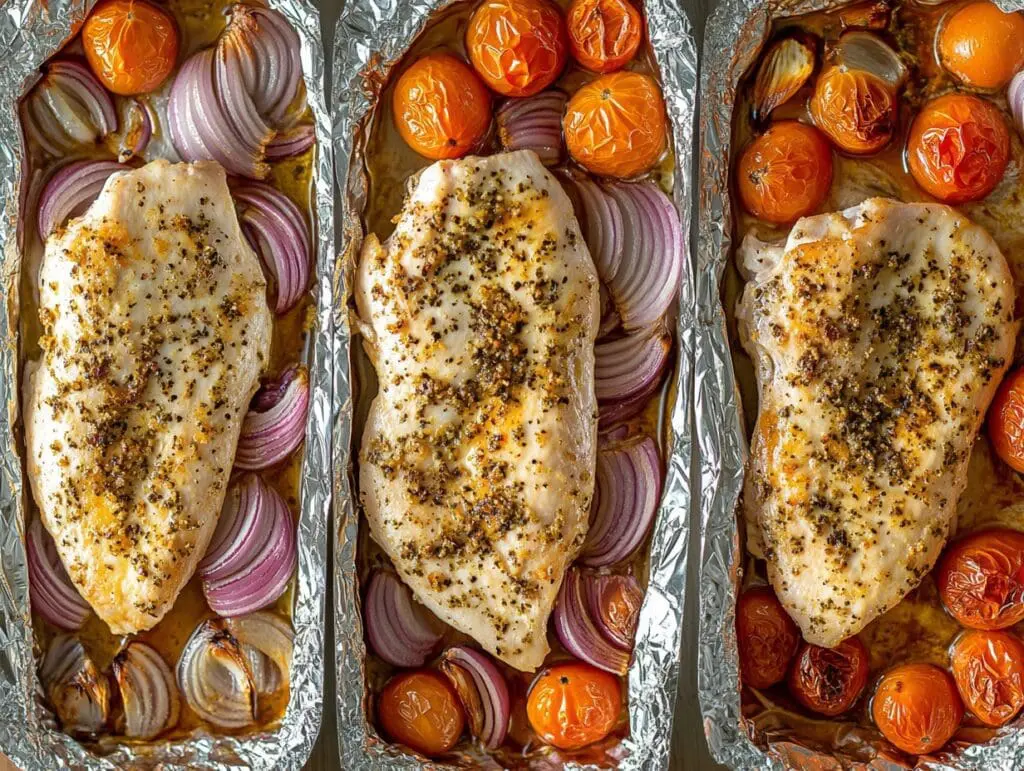
Prepare the foil trays. Shape three pieces of aluminum foil into small trays, ensuring they are sturdy enough to hold the ingredients.
Assemble the base. Place the foil trays on a large baking sheet and fill them with sliced red onions and tomatoes, creating a flavorful bed for the chicken.
Make the seasoning sauce. In a medium bowl, whisk together olive oil, soy sauce, brown sugar, oregano, dried rosemary, salt, black pepper, and crushed garlic cloves until well combined.
Prepare the chicken. Make shallow cuts on each chicken breast, allowing the seasonings to penetrate deeply and infuse every bite with flavor.
Season the chicken. Dip the chicken breasts into the prepared seasoning sauce, coating them evenly, then place them in the foil trays on top of the vegetables. Pour any remaining sauce over the chicken.
Bake to perfection. Preheat the oven to 180°C (350°F) and bake for 40 minutes. Keep an eye on the chicken, as cooking times may vary depending on the oven.
Add the cheese. After 40 minutes, sprinkle the grated mozzarella cheese evenly over each chicken breast.
Melt the cheese. Return the foil trays to the oven and bake for a few more minutes, until the cheese is completely melted and bubbly.
Serve and enjoy. Carefully remove the foil trays from the oven and let the chicken rest for a couple of minutes. Serve warm and enjoy this flavor-packed, cheesy, and juicy baked chicken!
Tips and Notes
Use heavy-duty foil. For sturdier trays that hold their shape, opt for heavy-duty aluminum foil or double-layer standard foil.
Slice the onions thinly. Thinly sliced red onions will caramelize beautifully, adding a subtle sweetness to the dish.
Marinate for deeper flavor. If time allows, let the chicken sit in the seasoning sauce for at least 30 minutes before baking to enhance its taste.
Adjust baking time. Cooking time may vary depending on the thickness of the chicken breasts. Use a meat thermometer to ensure the internal temperature reaches 75°C (165°F).
Customize the seasoning. Feel free to swap oregano and rosemary for thyme, basil, or Italian seasoning to experiment with different flavor profiles.
Add a crispy finish. If you love golden, bubbly cheese, broil the chicken for the last 2-3 minutes after adding the mozzarella.
Make it spicy. Add a pinch of cayenne pepper or red pepper flakes to the seasoning sauce for a bit of heat.
Storage and reheating. Store leftovers in an airtight container in the refrigerator for up to 3 days. Reheat in the oven at 160°C (325°F) until warmed through for the best texture.
With these helpful tips, your foil-baked chicken will turn out perfectly seasoned, tender, and cheesy every single time!
Variations
Make it smoky. Swap the oregano and rosemary for smoked paprika and cumin to add a deep, smoky flavor to the dish.
Try different cheeses. While mozzarella creates a creamy melt, you can use cheddar, gouda, or feta for a different taste and texture.
Use bone-in chicken. If you prefer bone-in, skin-on chicken thighs or drumsticks, increase the baking time to 50–55 minutes to ensure they are fully cooked.
Add more vegetables. Layer the foil trays with bell peppers, zucchini, or mushrooms to create a complete meal in one tray.
Go gluten-free. This recipe is naturally gluten-free, but be sure to check the soy sauce label for a certified gluten-free version or replace it with tamari.
Make it extra saucy. If you prefer a richer dish, add a splash of chicken broth or cream before baking for a juicier, more indulgent texture.
Give it a Mediterranean twist. Substitute the soy sauce and brown sugar with lemon juice and balsamic vinegar, and top with crumbled feta and olives.
With these easy variations, you can transform this dish into a new and exciting meal every time you make it!
Serving Suggestions
Pair with rice. Serve this juicy, flavorful chicken over a bed of fluffy white rice, brown rice, or fragrant jasmine rice to soak up the delicious juices.
Enjoy with roasted potatoes. A side of crispy roasted potatoes or garlic mashed potatoes makes this dish even more satisfying.
Serve with a fresh salad. Balance the richness with a light green salad, such as arugula with balsamic vinaigrette or a classic Greek salad.
Add grilled vegetables. Pair with grilled zucchini, asparagus, or bell peppers for a colorful and nutritious side.
Make it a sandwich. Slice the baked chicken and serve it in a warm baguette or pita bread with lettuce, tomatoes, and a drizzle of sauce for a quick and delicious sandwich.
Pair with crusty bread. Serve with warm garlic bread or a toasted baguette to scoop up the flavorful juices from the foil tray.
Enjoy with pasta. Toss the chicken with buttery fettuccine or penne for a creamy and indulgent meal.
With these delicious pairing ideas, this foil-baked chicken can be transformed into a variety of meals to suit any occasion!
Print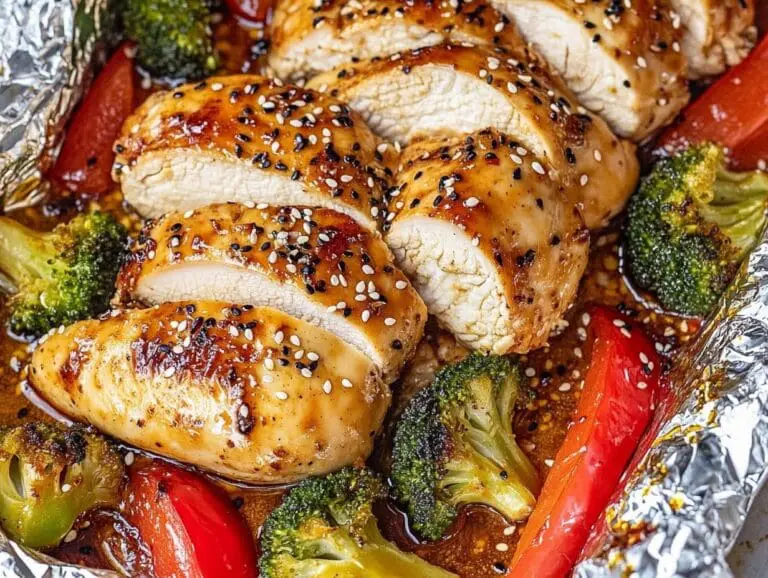
A Genius Trick for Baking Chicken in Foil Trays Everyone Should Know
This Baking Chicken in Foil Trays recipe is an easy, flavorful way to lock in moisture and enhance the taste of your chicken. Juicy, tender, and packed with delicious seasoning, this one-pan meal is perfect for busy weeknights!
- Total Time: 50 minutes
- Yield: 4 servings 1x
Ingredients
- 3 pieces of aluminum foil (shaped into trays)
- 2 red onions, sliced into half-moons
- 3 tomatoes, sliced into rounds
- 30 ml olive oil
- 20 ml soy sauce
- 30 g brown sugar
- 1 teaspoon oregano
- 1 teaspoon dried rosemary
- 1 teaspoon salt
- Pinch of black pepper
- 3 crushed garlic cloves
- 3 chicken breasts
- 150 g grated mozzarella cheese
Instructions
- Prepare the foil trays: Shape three pieces of aluminum foil into small trays and place them on a baking sheet.
- Assemble the base: Fill the foil trays with sliced red onions and tomatoes for a flavorful vegetable layer.
- Make the seasoning sauce: In a medium bowl, mix olive oil, soy sauce, brown sugar, oregano, dried rosemary, salt, black pepper, and crushed garlic cloves.
- Prepare the chicken: Make shallow cuts on each chicken breast to help absorb the seasoning.
- Season the chicken: Dip each chicken breast into the prepared seasoning sauce and place them in the foil trays on top of the vegetables.
- Bake: Preheat the oven to 180°C (350°F) and bake for 40 minutes, adjusting the time based on your oven.
- Add cheese: After 40 minutes, sprinkle grated mozzarella cheese on top of the chicken.
- Melt the cheese: Return to the oven for a few minutes until the cheese is melted and slightly golden.
- Serve and enjoy: Remove from the oven, garnish with fresh herbs if desired, and serve warm.
Notes
- Foil tray tip: Make sure the sides of the foil trays are high enough to prevent juices from spilling.
- Extra crispy texture: Broil the chicken for the last 2 minutes to get a golden, slightly crispy top.
- Vegetable swaps: Try adding bell peppers, zucchini, or mushrooms for extra flavor.
- Make it spicy: Add red pepper flakes or smoked paprika to the seasoning for a kick.
- Storage: Store leftovers in an airtight container for up to 3 days in the fridge.
- Prep Time: 10 minutes
- Cook Time: 40 minutes
- Category: Dinner
- Method: Baked
- Cuisine: American, Mediterranean
Nutrition
- Serving Size: 1 chicken breast with vegetables and cheese
- Calories: 350 kcal
- Sugar: 6g
- Sodium: 850mg
- Fat: 15g
- Saturated Fat: 5g
- Unsaturated Fat: 8g
- Trans Fat: 0g
- Carbohydrates: 12g
- Fiber: 2g
- Protein: 40g
- Cholesterol: 95mg
Keywords: baked chicken, foil tray chicken, easy chicken recipe, juicy baked chicken, one-pan meal, oven-baked chicken, meal prep chicken, foil packet chicken
Why This Recipe Is a Must-Try
This baked chicken in foil trays is more than just an easy meal—it’s a foolproof cooking method that delivers tender, flavorful, and juicy chicken every single time. Whether you’re looking for a quick weeknight dinner or a hassle-free meal prep solution, this recipe checks all the boxes.
Minimal cleanup. The foil tray eliminates the need for scrubbing pans, making this a perfect choice for busy nights.
Juicy and flavorful. The sealed foil traps in moisture, ensuring every bite is tender and well-seasoned.
Customizable and versatile. You can switch up the seasonings, add vegetables, or experiment with different cheeses to create endless variations.
Perfect for meal prep. Bake multiple servings at once and store them for easy reheating throughout the week.
A crowd-pleaser. This dish is family-friendly, packed with bold flavors, and sure to impress guests with its simplicity and taste.
Once you try this easy, flavorful, and mess-free baked chicken, it will quickly become a staple in your kitchen!
Frequently Asked Questions (FAQs)
Can I use chicken thighs instead of chicken breasts?
Yes, you can substitute bone-in or boneless chicken thighs. Just adjust the cooking time to 45-50 minutes for bone-in thighs to ensure they are fully cooked.
Do I need to cover the foil trays while baking?
No, the foil trays themselves trap enough steam to keep the chicken moist and juicy. However, if you want extra tenderness, you can cover them with foil for the first 20 minutes, then bake uncovered to allow the cheese to brown.
How do I know when the chicken is fully cooked?
Use a meat thermometer to check for an internal temperature of 75°C (165°F). The chicken should be firm, with no pink inside.
Can I make this dish ahead of time?
Yes! You can assemble the foil trays a day in advance, store them in the refrigerator, and bake when ready.
Can I freeze baked chicken in foil trays?
Absolutely. Let the cooked chicken cool completely, then store in an airtight container or freezer-safe bag for up to 3 months. Thaw overnight in the refrigerator and reheat in the oven at 160°C (325°F).
What other cheeses can I use?
Mozzarella is great for melting, but you can try cheddar, gouda, provolone, or feta for different flavors.
How can I make this dish spicier?
Add extra black pepper, cayenne pepper, or red pepper flakes to the seasoning mix, or drizzle with hot sauce before serving.
Can I cook vegetables with the chicken?
Yes, adding bell peppers, zucchini, or mushrooms to the foil trays creates a complete meal with minimal effort.
What if I don’t have soy sauce?
You can replace it with balsamic vinegar, Worcestershire sauce, or coconut aminos for a similar depth of flavor.
How can I reheat leftovers without drying them out?
Reheat in the oven at 160°C (325°F) for about 10 minutes, covering with foil to retain moisture, or warm in a skillet with a splash of water or broth.